| Name | Custom Google Forms |
| Make with | HTML,CSS,Javascript |
| Author | codemai |
| Keywords | codemai, How to Create - Add Custom Google Forms To Your Website |
How to Create - Add Custom Google Forms To Your Website
1. Create a new form
Firstly, go to Google Forms platform and sign in with your Google account. You can either start by creating a new form from scratch or use Google’s pre-made templates.
We will start with a blank template. Click the "Blank"
And we'll have a new default blank template with a multiple choice section first. But we'll replace it with another option. Click on
![]()
And choose one of "Short answer" (for short information like email, address, phone number, etc..) or "Paragraph" (for long information) in the menu that appears . Don't choose other than them because they are very difficult to use - custom for beginners .
Here, I'll choose "Short answer", but of course you can choose "Paragraph".
You can add more question sections in your form by clicking on ![]() .
.
Now, click on the settings button ( the settings button next to the Send button on the top of the page )
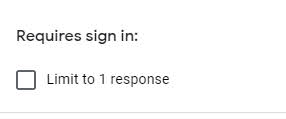
and uncheck the “Limit to 1 response” option.
This helps to prevent Google from requiring login before being able to fill in input fields.
2. Create a your custom form
Copy this code and paste it somewhere, this code will be used in the next step
<form action="" method="post">
      <button type="submit">Send</button>
</form>
Ok, if your form has n "Short answer" sections, repeat the following code n times:
<label>Question name</label>
<input type="type_name" name="" required>
type_name is
- text : if the question answer is a normal text
- email : if the question answer is a email address
- number : if the question answer is number
- etc...
required is only needed if that "required" option of that section is actived.
Question name is the quesion of your "Short answer" or "Paragraph" section.
Example: I have a form with only one "Short answer" section, required is false, and question name of this "Short answer" question is Email, type_name is email. So, I have:
If your form has n "Paragraph" sections, repeat the following code n times:
<label>Question name</label>
<textarea rows="5" placeholder="Write your answer here" name="" required></textarea>
required is only needed if that "required" option of that section is actived.
Save and go to the next step.
3. Add NAME and ACTION values to your custom form
Now, go back to step 1. Click on the "Preview" button (the Preview button next to the Settings button), and you will be taken to a new page.
In this new page, press F12 key to open "Developer tools" page.
You need to find the <form> tag in the HTML inspector and copy the value of the action attribute into your custom HTML.
 |
| Form |
 |
The red line is the value to be copied |
Then, insert it into the value of <form> tag of your custom form. Like this:
Next, click on
 button in the page top of "Developer tools" page, and then move your mouse cursor to the question section so that it is covered with a blue (green) layer, if ok click left mouse.
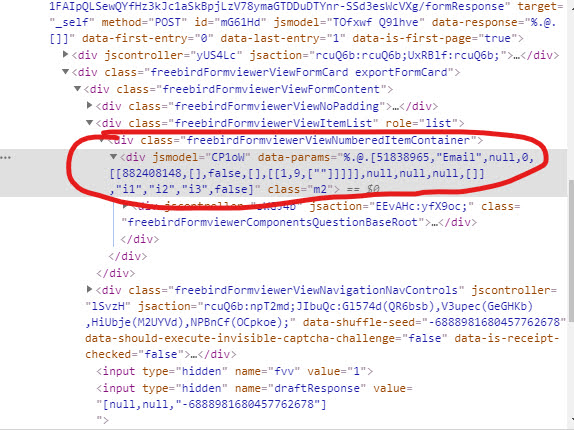
Now, look at developer tools section, you will see a snippet code covered with a transparent brown background.
Don't care about it, pay attention to the code above it.
Ok, copy the number after the 4th comma of value of data-params attribute and paste it into value of name attribute of corresponding <input> tag with structure : entry.number
For example: My custom form have only one "Short answer" section and the question name of "Short answer" section is "Email", when I did all the steps above i get : 882408148 . So that I will insert the value entry.882408148 into the name attribute of the corresponding input tag.
If your custom form has more than one (Short answer/Paragraph), just repeat the above steps for each section.
You now have a complete and usable custom Google form, with your own css styles to beautify your form.
4. Redirect To A Custom Thank You Page
By default, after the submission is complete. Google will redirect to Google's "Your response has been recorded" page. But, if you do not want to be redirected:
<script type="text/javascript">var submitted=false;</script>
<iframe name="hidden_iframe" id="hidden_iframe" style="display:none;"
onload="if(submitted) {}"></iframe>

<form action="https://docs.google.com/forms/u/0/d/e/1FAIpQLSewQYfHz3kJc1aSkBpjLzV78ymaGTDDuDTYnr-SSd3esWcVXg/formResponse"
method="post" target="hidden_iframe" onsubmit="submitted=true;">
    ....
</form>
If you don't want to redirect to your own page
<script type="text/javascript">var submitted=false;</script>
<iframe name="hidden_iframe" id="hidden_iframe" style="display:none;"
onload="if(submitted) { window.location='your-owwn-page-url-here' }"></iframe>

<form action="https://docs.google.com/forms/u/0/d/e/1FAIpQLSewQYfHz3kJc1aSkBpjLzV78ymaGTDDuDTYnr-SSd3esWcVXg/formResponse"
method="post" target="hidden_iframe" onsubmit="submitted=true;">
    ....
</form>
Information submitted will be displayed in the Responses tab.


